ELK 学习文档
Elasticsearch
什么是全文搜索引擎 ?
Google,百度类的网站搜索,它们都是根据网页中的关键字生成索引,我们在搜索的时候输入关键字,它们会将该关键字即索引匹配到的所有网页返回;还有常见的项目中应用日志的搜索等等。对于这些非结构化的数据文本,关系型数据库搜索不是能很好的支持
一般传统数据库,全文检索都实现的很鸡肋,因为一般也没人用数据库存文本字段。进行全文检索需要扫描整个表,如果数据量大的话即使对 SQL 的语法优化,也收效甚微。建立了索引,但是维护起来也很麻烦,对于 insert 和 update 操作都会重新构建索引
基于以上原因可以分析得出,在一些生产环境中,使用常规的搜索方式,性能是非常差的,例如:
- 搜索的数据对象是大量的非结构化的文本数据
- 文件记录量达到数十万或数百万个甚至更多
- 支持大量基于交互式文本的查询
- 需求非常灵活的全文搜索查询
- 对高度相关的搜索结果的有特殊需求,但是没有可用的关系数据库可以满足
- 对不同记录类型、非文本数据操作或安全事务处理的需求相对较少的情况
为了解决结构化数据搜索和非结构化数据搜索性能问题,我们就需要专业,健壮,强大的全文搜索引擎。
这里说到的全文搜索引擎指的是目前广泛应用的主流搜索引擎。它的工作原理是计算机索引程序通过扫描文章中的每一个词,对每一个词建立一个索引,指明该词在文章中出现的次数和位置,当用户查询时,检索程序就根据事先建立的索引进行查找,并将查找的结果反馈给用户的检索方式。这个过程类似于通过字典中的检索字表查字的过程。
Elasticsearch 应用案例
- GitHub: 2013 年初,抛弃了 Solr,采取 Elasticsearch 来做 PB 级的搜索。 “GitHub 使用Elasticsearch 搜索 20TB 的数据,包括 13 亿文件和 1300 亿行代码”
- 维基百科:启动以 Elasticsearch 为基础的核心搜索架构
- 百度:目前广泛使用 Elasticsearch 作为文本数据分析,采集百度所有服务器上的各类指标数据及用户自定义数据,通过对各种数据进行多维分析展示,辅助定位分析实例异常或业务层面异常。目前覆盖百度内部 20 多个业务线(包括云分析、网盟、预测、文库、直达号、钱包、 风控等),单集群最大 100 台机器, 200 个 ES 节点,每天导入 30TB+数据
- 新浪:使用 Elasticsearch 分析处理 32 亿条实时日志
- 阿里:使用 Elasticsearch 构建日志采集和分析体系
- Stack Overflow:解决 Bug 问题的网站,全英文,编程人员交流的网站
Elasticsearch 基本使用
Windows 版的 Elasticsearch 压缩包,解压即安装完毕,解压后的目录结构如下
| 目录 | 含义 |
|---|---|
| bin | 可执行脚本目录 |
| config | 配置目录 |
| jdk | 内置 JDK 目录 |
| lib | 类库 |
| logs | 日志目录 |
| modules | 模块目录 |
| plugins | 插件目录 |
解压后,进入 bin 文件目录,点击 elasticsearch.bat 文件启动 ES 服务
注意
9300 端口为 Elasticsearch 集群间组件的通信端口, 9200 端口为浏览器访问的 http协议 RESTFUL 端口
打开浏览器,输入地址: http://localhost:9200,测试返回结果,返回结果如下:
{
  "name" : "DESKTOP-LNJQ0VF",
  "cluster_name" : "elasticsearch",
  "cluster_uuid" : "nCZqBhfdT1-pw8Yas4QU9w",
  "version" : {
    "number" : "7.8.0",
    "build_flavor" : "default",
    "build_type" : "zip",
    "build_hash" : "757314695644ea9a1dc2fecd26d1a43856725e65",
    "build_date" : "2020-06-14T19:35:50.234439Z",
    "build_snapshot" : false,
    "lucene_version" : "8.5.1",
    "minimum_wire_compatibility_version" : "6.8.0",
    "minimum_index_compatibility_version" : "6.0.0-beta1"
  },
  "tagline" : "You Know, for Search"
}
Elasticsearch 是面向文档型数据库,一条数据在这里就是一个文档。 为了方便大家理解,我们将 Elasticsearch 里存储文档数据和关系型数据库 MySQL 存储数据的概念进行一个类比
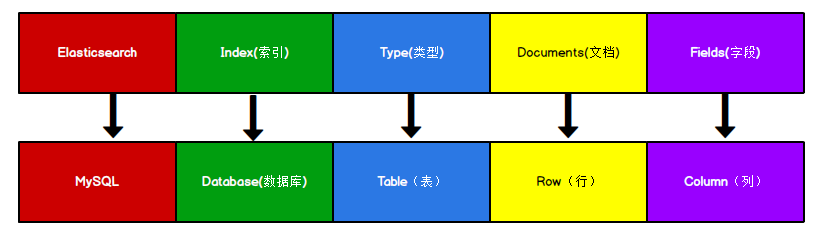
ES 里的 Index 可以看做一个库,而 Types 相当于表, Documents 则相当于表的行。这里 Types 的概念已经被逐渐弱化, Elasticsearch 6.X 中,一个 index 下已经只能包含一个type, Elasticsearch 7.X 中, Type 的概念已经被删除了。
索引-创建
对比关系型数据库,创建索引就等同于创建数据库。
在 Postman 中,向 ES 服务器发 PUT 请求 :** http://127.0.0.1:9200/shopping**
请求后,服务器返回响应:
{
    "acknowledged": true,//响应结果
    "shards_acknowledged": true,//分片结果
    "index": "shopping"//索引名称
}
索引-查询 & 删除
查看所有索引,在 Postman 中,向 ES 服务器发 GET 请求 : http://127.0.0.1:9200/_cat/indices?v
这里请求路径中的_cat 表示查看的意思, indices 表示索引,所以整体含义就是查看当前 ES服务器中的所有索引,就好像 MySQL 中的 show tables 的感觉,服务器响应结果如下 :
health status index    uuid                   pri rep docs.count docs.deleted store.size pri.store.size
yellow open   shopping J0WlEhh4R7aDrfIc3AkwWQ   1   1          0            0       208b           208b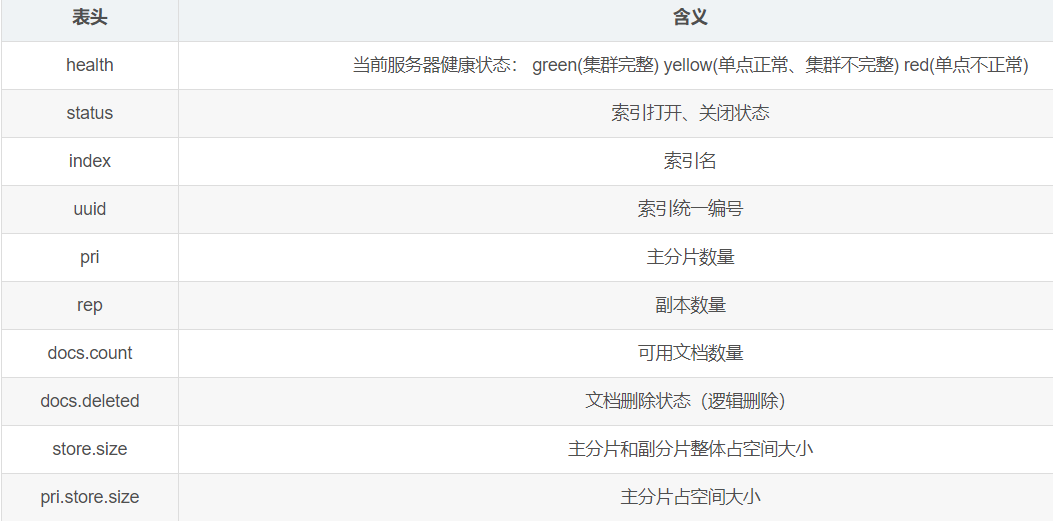
查看单个索引
GET 请求 : http://127.0.0.1:9200/shopping
返回结果如下:
{
    "shopping": { // 索引名
        "aliases": {}, // 别名
        "mappings": {}, // 映射
        "settings": { // 设置
            "index": { // 设置 - 索引
                "creation_date": "1617861426847", // 设置 - 索引 - 创建时间
                "number_of_shards": "1", // 设置 - 索引 - 主分片数量
                "number_of_replicas": "1", // 设置 - 索引 - 主分片数量
                "uuid": "J0WlEhh4R7aDrfIc3AkwWQ", // 设置 - 索引 - 主分片数量
                "version": { // 设置 - 索引 - 主分片数量
                    "created": "7080099"
                },
                "provided_name": "shopping" // 设置 - 索引 - 主分片数量
            }
        }
    }
}
删除索引
DELETE 请求 : http://127.0.0.1:9200/shopping
返回结果如下:
{
    "acknowledged": true
}
再次查看所有索引,GET http://127.0.0.1:9200/_cat/indices?v
返回结果如下:
health status index uuid pri rep docs.count docs.deleted store.size pri.store.size成功删除
文档-创建(Put & Post)
POST 请求 : http://127.0.0.1:9200/shopping/_doc
请求体JSON内容为:
{
    "title": "小米手机",
    "category": "小米",
    "images": "http://www.gulixueyuan.com/xm.jpg",
    "price": 3999.00
}
注意,此处发送请求的方式必须为 POST,不能是 PUT,否则会发生错误 。
返回结果:
{
    "_index": "shopping",//索引
    "_type": "_doc",//类型-文档
    "_id": "ANQqsHgBaKNfVnMbhZYU",//唯一标识,可以类比为 MySQL 中的主键,随机生成
    "_version": 1,//版本
    "result": "created",//结果,这里的 create 表示创建成功
    "_shards": {//
        "total": 2,//分片 - 总数
        "successful": 1,//分片 - 总数
        "failed": 0//分片 - 总数
    },
    "_seq_no": 0,
    "_primary_term": 1
}
上面的数据创建后,由于没有指定数据唯一性标识(ID),默认情况下, ES 服务器会随机生成一个。如果想要自定义唯一性标识,需要在创建时指定
POST 请求 :http://127.0.0.1:9200/shopping/_doc/1
请求体JSON内容为:
{
    "title":"小米手机",
    "category":"小米",
    "images":"http://www.gulixueyuan.com/xm.jpg",
    "price":3999.00
}
注意
如果增加数据时明确数据主键,那么请求方式也可以为 PUT。
返回结果如下:
{
    "_index": "shopping",
    "_type": "_doc",
    "_id": "1",//<------------------自定义唯一性标识
    "_version": 1,
    "result": "created",
    "_shards": {
        "total": 2,
        "successful": 1,
        "failed": 0
    },
    "_seq_no": 1,
    "_primary_term": 1
}
查询-主键查询 & 全查询
GET 请求 : http://127.0.0.1:9200/shopping/_doc/1
返回结果如下:
{
    "_index": "shopping",
    "_type": "_doc",
    "_id": "1",
    "_version": 1,
    "_seq_no": 1,
    "_primary_term": 1,
    "found": true,
    "_source": {
        "title": "小米手机",
        "category": "小米",
        "images": "http://www.gulixueyuan.com/xm.jpg",
        "price": 3999
    }
}
查找不存在的内容,向 ES 服务器发 GET 请求 : http://127.0.0.1:9200/shopping/_doc/1001
返回结果如下:
{
    "_index": "shopping",
    "_type": "_doc",
    "_id": "1001",
    "found": false
}
查看索引下所有数据,向 ES 服务器发 GET 请求 : http://127.0.0.1:9200/shopping/_search
返回结果如下:
{
    "took": 133,
    "timed_out": false,
    "_shards": {
        "total": 1,
        "successful": 1,
        "skipped": 0,
        "failed": 0
    },
    "hits": {
        "total": {
            "value": 2,
            "relation": "eq"
        },
        "max_score": 1,
        "hits": [
            {
                "_index": "shopping",
                "_type": "_doc",
                "_id": "ANQqsHgBaKNfVnMbhZYU",
                "_score": 1,
                "_source": {
                    "title": "小米手机",
                    "category": "小米",
                    "images": "http://www.gulixueyuan.com/xm.jpg",
                    "price": 3999
                }
            },
            {
                "_index": "shopping",
                "_type": "_doc",
                "_id": "1",
                "_score": 1,
                "_source": {
                    "title": "小米手机",
                    "category": "小米",
                    "images": "http://www.gulixueyuan.com/xm.jpg",
                    "price": 3999
                }
            }
        ]
    }
}
全量修改
POST 请求 : http://127.0.0.1:9200/shopping/_doc/1
请求体JSON内容为:
{
    "title":"华为手机",
    "category":"华为",
    "images":"http://www.gulixueyuan.com/hw.jpg",
    "price":1999.00
}
修改成功后,服务器响应结果:
{
    "_index": "shopping",
    "_type": "_doc",
    "_id": "1",
    "_version": 2,
    "result": "updated",//<-----------updated 表示数据被更新
    "_shards": {
        "total": 2,
        "successful": 1,
        "failed": 0
    },
    "_seq_no": 2,
    "_primary_term": 1
}
局部修改
POST 请求 : http://127.0.0.1:9200/shopping/_update/1
请求体JSON内容为:
{
	"doc": {
		"title":"小米手机",
		"category":"小米"
	}
}
返回结果如下:
{
    "_index": "shopping",
    "_type": "_doc",
    "_id": "1",
    "_version": 3,
    "result": "updated",//<-----------updated 表示数据被更新
    "_shards": {
        "total": 2,
        "successful": 1,
        "failed": 0
    },
    "_seq_no": 3,
    "_primary_term": 1
}
GET请求 : http://127.0.0.1:9200/shopping/_doc/1
查看修改内容:
{
    "_index": "shopping",
    "_type": "_doc",
    "_id": "1",
    "_version": 3,
    "_seq_no": 3,
    "_primary_term": 1,
    "found": true,
    "_source": {
        "title": "小米手机",
        "category": "小米",
        "images": "http://www.gulixueyuan.com/hw.jpg",
        "price": 1999
    }
}
删除
DELETE 请求 : http://127.0.0.1:9200/shopping/_doc/1
返回结果:
{
    "_index": "shopping",
    "_type": "_doc",
    "_id": "1",
    "_version": 4,
    "result": "deleted",//<---删除成功
    "_shards": {
        "total": 2,
        "successful": 1,
        "failed": 0
    },
    "_seq_no": 4,
    "_primary_term": 1
}
向 ES 服务器发 GET请求 : http://127.0.0.1:9200/shopping/_doc/1
查看是否删除成功:
{
    "_index": "shopping",
    "_type": "_doc",
    "_id": "1",
    "found": false
}
条件查询
GET请求 : http://127.0.0.1:9200/shopping/_search
{
    "took": 5,
    "timed_out": false,
    "_shards": {
        "total": 1,
        "successful": 1,
        "skipped": 0,
        "failed": 0
    },
    "hits": {
        "total": {
            "value": 6,
            "relation": "eq"
        },
        "max_score": 1,
        "hits": [
            {
                "_index": "shopping",
                "_type": "_doc",
                "_id": "ANQqsHgBaKNfVnMbhZYU",
                "_score": 1,
                "_source": {
                    "title": "小米手机",
                    "category": "小米",
                    "images": "http://www.gulixueyuan.com/xm.jpg",
                    "price": 3999
                }
            },
            {
                "_index": "shopping",
                "_type": "_doc",
                "_id": "A9R5sHgBaKNfVnMb25Ya",
                "_score": 1,
                "_source": {
                    "title": "小米手机",
                    "category": "小米",
                    "images": "http://www.gulixueyuan.com/xm.jpg",
                    "price": 1999
                }
            },
            {
                "_index": "shopping",
                "_type": "_doc",
                "_id": "BNR5sHgBaKNfVnMb7pal",
                "_score": 1,
                "_source": {
                    "title": "小米手机",
                    "category": "小米",
                    "images": "http://www.gulixueyuan.com/xm.jpg",
                    "price": 1999
                }
            },
            {
                "_index": "shopping",
                "_type": "_doc",
                "_id": "BtR6sHgBaKNfVnMbX5Y5",
                "_score": 1,
                "_source": {
                    "title": "华为手机",
                    "category": "华为",
                    "images": "http://www.gulixueyuan.com/xm.jpg",
                    "price": 1999
                }
            },
            {
                "_index": "shopping",
                "_type": "_doc",
                "_id": "B9R6sHgBaKNfVnMbZpZ6",
                "_score": 1,
                "_source": {
                    "title": "华为手机",
                    "category": "华为",
                    "images": "http://www.gulixueyuan.com/xm.jpg",
                    "price": 1999
                }
            },
            {
                "_index": "shopping",
                "_type": "_doc",
                "_id": "CdR7sHgBaKNfVnMbsJb9",
                "_score": 1,
                "_source": {
                    "title": "华为手机",
                    "category": "华为",
                    "images": "http://www.gulixueyuan.com/xm.jpg",
                    "price": 1999
                }
            }
        ]
    }
}
URL带参查询
GET请求 : http://127.0.0.1:9200/shopping/_search?q=category:小米
返回结果如下:
{
    "took": 94,
    "timed_out": false,
    "_shards": {
        "total": 1,
        "successful": 1,
        "skipped": 0,
        "failed": 0
    },
    "hits": {
        "total": {
            "value": 3,
            "relation": "eq"
        },
        "max_score": 1.3862942,
        "hits": [
            {
                "_index": "shopping",
                "_type": "_doc",
                "_id": "ANQqsHgBaKNfVnMbhZYU",
                "_score": 1.3862942,
                "_source": {
                    "title": "小米手机",
                    "category": "小米",
                    "images": "http://www.gulixueyuan.com/xm.jpg",
                    "price": 3999
                }
            },
            {
                "_index": "shopping",
                "_type": "_doc",
                "_id": "A9R5sHgBaKNfVnMb25Ya",
                "_score": 1.3862942,
                "_source": {
                    "title": "小米手机",
                    "category": "小米",
                    "images": "http://www.gulixueyuan.com/xm.jpg",
                    "price": 1999
                }
            },
            {
                "_index": "shopping",
                "_type": "_doc",
                "_id": "BNR5sHgBaKNfVnMb7pal",
                "_score": 1.3862942,
                "_source": {
                    "title": "小米手机",
                    "category": "小米",
                    "images": "http://www.gulixueyuan.com/xm.jpg",
                    "price": 1999
                }
            }
        ]
    }
}
请求体带参查询
GET请求 : http://127.0.0.1:9200/shopping/_search
附带JSON体如下:
{
	"query":{
		"match":{
			"category":"小米"
		}
	}
}
带请求体方式的查找所有内容
GET请求 : http://127.0.0.1:9200/shopping/_search
附带JSON体如下:
{
	"query":{
		"match_all":{}
	}
}
查询指定字段
GET请求 : http://127.0.0.1:9200/shopping/_search
附带JSON体如下:
{
	"query":{
		"match_all":{}
	},
	"_source":["title"]
}
分页查询
GET请求 : http://127.0.0.1:9200/shopping/_search
附带JSON体如下:
{
	"query":{
		"match_all":{}
	},
	"from":0,
	"size":2
}
查询排序
GET请求 : http://127.0.0.1:9200/shopping/_search
附带JSON体如下:
{
	"query":{
		"match_all":{}
	},
	"sort":{
		"price":{
			"order":"desc"
		}
	}
}
多条件查询
假设想找出小米牌子,价格为3999元的。(must相当于数据库的&&)
GET请求 : http://127.0.0.1:9200/shopping/_search
附带JSON体如下:
{
	"query":{
		"bool":{
			"must":[{
				"match":{
					"category":"小米"
				}
			},{
				"match":{
					"price":3999.00
				}
			}]
		}
	}
}
假设想找出小米和华为的牌子。(should相当于数据库的||)
GET请求 : http://127.0.0.1:9200/shopping/_search
附带JSON体如下:
{
	"query":{
		"bool":{
			"should":[{
				"match":{
					"category":"小米"
				}
			},{
				"match":{
					"category":"华为"
				}
			}]
		},
        "filter":{
            "range":{
                "price":{
                    "gt":2000
                }
            }
        }
	}
}
范围查询
假设想找出小米和华为的牌子,价格大于2000元的手机。
GET请求 : http://127.0.0.1:9200/shopping/_search
附带JSON体如下:
{
	"query":{
		"bool":{
			"should":[{
				"match":{
					"category":"小米"
				}
			},{
				"match":{
					"category":"华为"
				}
			}],
            "filter":{
            	"range":{
                	"price":{
                    	"gt":2000
                	}
	            }
    	    }
		}
	}
}
全文检索
这功能像搜索引擎那样,如品牌输入“小华”,返回结果带回品牌有“小米”和华为的。
GET请求 : http://127.0.0.1:9200/shopping/_search
附带JSON体如下:
{
	"query":{
		"match":{
			"category" : "小华"
		}
	}
}
完全匹配
GET请求 : http://127.0.0.1:9200/shopping/_search
附带JSON体如下:
{
	"query":{
		"match_phrase":{
			"category" : "为"
		}
	}
}
高亮查询
GET请求 : http://127.0.0.1:9200/shopping/_search
附带JSON体如下:
{
	"query":{
		"match_phrase":{
			"category" : "为"
		}
	},
    "highlight":{
        "fields":{
            "category":{}//<----高亮这字段
        }
    }
}
聚合查询
聚合允许使用者对 es 文档进行统计分析,类似与关系型数据库中的 group by,当然还有很多其他的聚合,例如取最大值max、平均值avg等等。
接下来按price字段进行分组:
GET请求 : http://127.0.0.1:9200/shopping/_search
附带JSON体如下:
{
	"aggs":{//聚合操作
		"price_group":{//名称,随意起名
			"terms":{//分组
				"field":"price"//分组字段
			}
		}
	}
}
上面返回结果会附带原始数据的。若不想要不附带原始数据的结果
ES 服务器发 GET请求 : http://127.0.0.1:9200/shopping/_search
附带JSON体如下:
{
	"aggs":{
		"price_group":{
			"terms":{
				"field":"price"
			}
		}
	},
    "size":0
}
若想对所有手机价格求平均值
GET请求 : http://127.0.0.1:9200/shopping/_search
附带JSON体如下:
{
	"aggs":{
		"price_avg":{//名称,随意起名
			"avg":{//求平均
				"field":"price"
			}
		}
	},
    "size":0
}
映射关系
有了索引库,等于有了数据库中的 database。
接下来就需要建索引库(index)中的映射了,类似于数据库(database)中的表结构(table)。
创建数据库表需要设置字段名称,类型,长度,约束等;索引库也一样,需要知道这个类型下有哪些字段,每个字段有哪些约束信息,这就叫做映射(mapping)
先创建一个索引:
# PUT http://127.0.0.1:9200/user创建映射
//  PUT http://127.0.0.1:9200/user/_mapping
{
    "properties": {
        "name": {
            "type": "text", // 允许分词
            "index": true
        },
        "sex": {
            "type": "keyword", // 关键字无法分开必须完全匹配
            "index": true
        },
        "tel": {
            "type": "keyword",
            "index": false   // 不支持索引查询
        }
    }
}
查询映射
#GET http://127.0.0.1:9200/user/_mapping返回结果如下:
{
    "user": {
        "mappings": {
            "properties": {
                "name": {
                    "type": "text"
                },
                "sex": {
                    "type": "keyword"
                },
                "tel": {
                    "type": "keyword",
                    "index": false
                }
            }
        }
    }
}
增加数据
// PUT http://127.0.0.1:9200/user/_create/1001
{
	"name":"小米",
	"sex":"男的",
	"tel":"1111"
}
查找name含有”小“数据:
// GET http://127.0.0.1:9200/user/_search
{
	"query":{
		"match":{
			"name":"小"
		}
	}
}
JavaAPI
添加依赖:
<dependencies>
    <dependency>
        <groupId>org.elasticsearch</groupId>
        <artifactId>elasticsearch</artifactId>
        <version>7.8.0</version>
    </dependency>
    <!-- elasticsearch 的客户端 -->
    <dependency>
        <groupId>org.elasticsearch.client</groupId>
        <artifactId>elasticsearch-rest-high-level-client</artifactId>
        <version>7.8.0</version>
    </dependency>
    <!-- elasticsearch 依赖 2.x 的 log4j -->
    <dependency>
        <groupId>org.apache.logging.log4j</groupId>
        <artifactId>log4j-api</artifactId>
        <version>2.8.2</version>
    </dependency>
    <dependency>
        <groupId>org.apache.logging.log4j</groupId>
        <artifactId>log4j-core</artifactId>
        <version>2.8.2</version>
    </dependency>
    <dependency>
        <groupId>com.fasterxml.jackson.core</groupId>
        <artifactId>jackson-databind</artifactId>
        <version>2.9.9</version>
    </dependency>
    <!-- junit 单元测试 -->
    <dependency>
        <groupId>junit</groupId>
        <artifactId>junit</artifactId>
        <version>4.12</version>
    </dependency>
</dependencies>
HelloElasticsearch
import java.io.IOException;

import org.apache.http.HttpHost;
import org.elasticsearch.client.RestClient;
import org.elasticsearch.client.RestHighLevelClient;

public class HelloElasticsearch {

	public static void main(String[] args) throws IOException {
		// 创建客户端对象
		RestHighLevelClient client = new RestHighLevelClient(
				RestClient.builder(new HttpHost("localhost", 9200, "http")));
        //		...
		System.out.println(client);

		// 关闭客户端连接
		client.close();
	}
}
索引-创建
public class CreateIndex {

    public static void main(String[] args) throws IOException {
        // 创建客户端对象
        RestHighLevelClient client = new RestHighLevelClient(
                RestClient.builder(new HttpHost("localhost", 9200, "http")));

        // 创建索引 - 请求对象
        CreateIndexRequest request = new CreateIndexRequest("user2");
        // 发送请求,获取响应
        CreateIndexResponse response = client.indices().create(request,
                RequestOptions.DEFAULT);
        boolean acknowledged = response.isAcknowledged();
        // 响应状态
        System.out.println("操作状态 = " + acknowledged);

        // 关闭客户端连接
        client.close();
    }

}
索引-查询 & 删除
查询
public class SearchIndex {
    public static void main(String[] args) throws IOException {
        // 创建客户端对象
        RestHighLevelClient client = new RestHighLevelClient(
                RestClient.builder(new HttpHost("localhost", 9200, "http")));

        // 查询索引 - 请求对象
        GetIndexRequest request = new GetIndexRequest("user2");
        // 发送请求,获取响应
        GetIndexResponse response = client.indices().get(request,
                RequestOptions.DEFAULT);

        System.out.println("aliases:"+response.getAliases());
        System.out.println("mappings:"+response.getMappings());
        System.out.println("settings:"+response.getSettings());

        client.close();
    }
}
删除
public class DeleteIndex {
    public static void main(String[] args) throws IOException {
        RestHighLevelClient client = new RestHighLevelClient(
                RestClient.builder(new HttpHost("localhost", 9200, "http")));
        // 删除索引 - 请求对象
        DeleteIndexRequest request = new DeleteIndexRequest("user2");
        // 发送请求,获取响应
        AcknowledgedResponse response = client.indices().delete(request,RequestOptions.DEFAULT);
        // 操作结果
        System.out.println("操作结果 : " + response.isAcknowledged());
        client.close();
    }
}
文档-新增 & 修改
重构 上文由于频繁使用以下连接Elasticsearch和关闭它的代码,于是个人对它进行重构。
public class SomeClass {
    public static void main(String[] args) throws IOException {
        RestHighLevelClient client = new RestHighLevelClient(
                RestClient.builder(new HttpHost("localhost", 9200, "http")));

        ...

        client.close();
    }
}
重构后的代码:
import org.elasticsearch.client.RestHighLevelClient;

public interface ElasticsearchTask {

    void doSomething(RestHighLevelClient client) throws Exception;

}public class ConnectElasticsearch{
public static void connect(ElasticsearchTask task){
// 创建客户端对象
RestHighLevelClient client = new RestHighLevelClient(
RestClient.builder(new HttpHost("localhost", 9200, "http")));
try {
task.doSomething(client);
// 关闭客户端连接
client.close();
} catch (Exception e) {
e.printStackTrace();
}
}
}接下来,如果想让Elasticsearch完成一些操作,就编写一个lambda式即可。
public class SomeClass {

    public static void main(String[] args) {
        ConnectElasticsearch.connect(client -> {
			//do something
        });
    }
}
新增
public class InsertDoc {

    public static void main(String[] args) {
        ConnectElasticsearch.connect(client -> {
            // 新增文档 - 请求对象
            IndexRequest request = new IndexRequest();
            // 设置索引及唯一性标识
            request.index("user").id("1001");

            // 创建数据对象
            User user = new User();
            user.setName("zhangsan");
            user.setAge(30);
            user.setSex("男");

            ObjectMapper objectMapper = new ObjectMapper();
            String productJson = objectMapper.writeValueAsString(user);
            // 添加文档数据,数据格式为 JSON 格式
            request.source(productJson, XContentType.JSON);
            // 客户端发送请求,获取响应对象
            IndexResponse response = client.index(request, RequestOptions.DEFAULT);
            3.打印结果信息
            System.out.println("_index:" + response.getIndex());
            System.out.println("_id:" + response.getId());
            System.out.println("_result:" + response.getResult());
        });
    }
}
修改
public class UpdateDoc {

    public static void main(String[] args) {
        ConnectElasticsearch.connect(client -> {
            // 修改文档 - 请求对象
            UpdateRequest request = new UpdateRequest();
            // 配置修改参数
            request.index("user").id("1001");
            // 设置请求体,对数据进行修改
            request.doc(XContentType.JSON, "sex", "女");
            // 客户端发送请求,获取响应对象
            UpdateResponse response = client.update(request, RequestOptions.DEFAULT);
            System.out.println("_index:" + response.getIndex());
            System.out.println("_id:" + response.getId());
            System.out.println("_result:" + response.getResult());
        });
    }

}
文档-查询 & 删除
查询
public class GetDoc {

    public static void main(String[] args) {
        ConnectElasticsearch.connect(client -> {
            //1.创建请求对象
            GetRequest request = new GetRequest().index("user").id("1001");
            //2.客户端发送请求,获取响应对象
            GetResponse response = client.get(request, RequestOptions.DEFAULT);
            3.打印结果信息
            System.out.println("_index:" + response.getIndex());
            System.out.println("_type:" + response.getType());
            System.out.println("_id:" + response.getId());
            System.out.println("source:" + response.getSourceAsString());
        });
    }
}
删除
public class DeleteDoc {
    public static void main(String[] args) {
        ConnectElasticsearch.connect(client -> {
            //创建请求对象
            DeleteRequest request = new DeleteRequest().index("user").id("1001");
            //客户端发送请求,获取响应对象
            DeleteResponse response = client.delete(request, RequestOptions.DEFAULT);
            //打印信息
            System.out.println(response.toString());
        });
    }
}
文档-批量新增 & 批量删除
批量新增
public class BatchInsertDoc {

    public static void main(String[] args) {
        ConnectElasticsearch.connect(client -> {
            //创建批量新增请求对象
            BulkRequest request = new BulkRequest();
            request.add(new
                    IndexRequest().index("user").id("1001").source(XContentType.JSON, "name",
                    "zhangsan"));
            request.add(new
                    IndexRequest().index("user").id("1002").source(XContentType.JSON, "name",
                            "lisi"));
            request.add(new
                    IndexRequest().index("user").id("1003").source(XContentType.JSON, "name",
                    "wangwu"));
            //客户端发送请求,获取响应对象
            BulkResponse responses = client.bulk(request, RequestOptions.DEFAULT);
            //打印结果信息
            System.out.println("took:" + responses.getTook());
            System.out.println("items:" + responses.getItems());
        });
    }
}
批量删除
public class BatchDeleteDoc {
    public static void main(String[] args) {
        ConnectElasticsearch.connect(client -> {
            //创建批量删除请求对象
            BulkRequest request = new BulkRequest();
            request.add(new DeleteRequest().index("user").id("1001"));
            request.add(new DeleteRequest().index("user").id("1002"));
            request.add(new DeleteRequest().index("user").id("1003"));
            //客户端发送请求,获取响应对象
            BulkResponse responses = client.bulk(request, RequestOptions.DEFAULT);
            //打印结果信息
            System.out.println("took:" + responses.getTook());
            System.out.println("items:" + responses.getItems());
        });
    }
}
文档-高级查询
全量查询
public class BatchInsertDoc {

    public static void main(String[] args) {
        ConnectElasticsearch.connect(client -> {
            //创建批量新增请求对象
            BulkRequest request = new BulkRequest();
            request.add(new IndexRequest().index("user").id("1001").source(XContentType.JSON, "name", "zhangsan", "age", "10", "sex","女"));
            request.add(new IndexRequest().index("user").id("1002").source(XContentType.JSON, "name", "lisi", "age", "30", "sex","女"));
            request.add(new IndexRequest().index("user").id("1003").source(XContentType.JSON, "name", "wangwu1", "age", "40", "sex","男"));
            request.add(new IndexRequest().index("user").id("1004").source(XContentType.JSON, "name", "wangwu2", "age", "20", "sex","女"));
            request.add(new IndexRequest().index("user").id("1005").source(XContentType.JSON, "name", "wangwu3", "age", "50", "sex","男"));
            request.add(new IndexRequest().index("user").id("1006").source(XContentType.JSON, "name", "wangwu4", "age", "20", "sex","男"));
            //客户端发送请求,获取响应对象
            BulkResponse responses = client.bulk(request, RequestOptions.DEFAULT);
            //打印结果信息
            System.out.println("took:" + responses.getTook());
            System.out.println("items:" + responses.getItems());
        });
    }
}
查询所有索引数据
public class QueryDoc {

    public static void main(String[] args) {
        ConnectElasticsearch.connect(client -> {
            // 创建搜索请求对象
            SearchRequest request = new SearchRequest();
            request.indices("user");
            // 构建查询的请求体
            SearchSourceBuilder sourceBuilder = new SearchSourceBuilder();
            // 查询所有数据
            sourceBuilder.query(QueryBuilders.matchAllQuery());
            request.source(sourceBuilder);
            SearchResponse response = client.search(request, RequestOptions.DEFAULT);
            // 查询匹配
            SearchHits hits = response.getHits();
            System.out.println("took:" + response.getTook());
            System.out.println("timeout:" + response.isTimedOut());
            System.out.println("total:" + hits.getTotalHits());
            System.out.println("MaxScore:" + hits.getMaxScore());
            System.out.println("hits========>>");
            for (SearchHit hit : hits) {
            //输出每条查询的结果信息
                System.out.println(hit.getSourceAsString());
            }
            System.out.println("<<========");
        });
    }

}
条件查询
public class QueryDoc {

	public static final ElasticsearchTask SEARCH_BY_CONDITION = client -> {
        // 创建搜索请求对象
        SearchRequest request = new SearchRequest();
        request.indices("user");
        // 构建查询的请求体
        SearchSourceBuilder sourceBuilder = new SearchSourceBuilder();
        sourceBuilder.query(QueryBuilders.termQuery("age", "30"));
        request.source(sourceBuilder);
        SearchResponse response = client.search(request, RequestOptions.DEFAULT);
        // 查询匹配
        SearchHits hits = response.getHits();
        System.out.println("took:" + response.getTook());
        System.out.println("timeout:" + response.isTimedOut());
        System.out.println("total:" + hits.getTotalHits());
        System.out.println("MaxScore:" + hits.getMaxScore());
        System.out.println("hits========>>");
        for (SearchHit hit : hits) {
            //输出每条查询的结果信息
            System.out.println(hit.getSourceAsString());
        }
        System.out.println("<<========");
    };

    public static void main(String[] args) {
        ConnectElasticsearch.connect(SEARCH_BY_CONDITION);
    }
}
分页查询
public class QueryDoc {

	public static final ElasticsearchTask SEARCH_BY_PAGING = client -> {
        // 创建搜索请求对象
        SearchRequest request = new SearchRequest();
        request.indices("user");
        // 构建查询的请求体
        SearchSourceBuilder sourceBuilder = new SearchSourceBuilder();
        sourceBuilder.query(QueryBuilders.matchAllQuery());
        // 分页查询
        // 当前页其实索引(第一条数据的顺序号), from
        sourceBuilder.from(0);

        // 每页显示多少条 size
        sourceBuilder.size(2);
        request.source(sourceBuilder);
        SearchResponse response = client.search(request, RequestOptions.DEFAULT);
        // 查询匹配
        SearchHits hits = response.getHits();
        System.out.println("took:" + response.getTook());
        System.out.println("timeout:" + response.isTimedOut());
        System.out.println("total:" + hits.getTotalHits());
        System.out.println("MaxScore:" + hits.getMaxScore());
        System.out.println("hits========>>");
        for (SearchHit hit : hits) {
            //输出每条查询的结果信息
            System.out.println(hit.getSourceAsString());
        }
        System.out.println("<<========");
    };

    public static void main(String[] args) {
        ConnectElasticsearch.connect(SEARCH_BY_CONDITION);
    }

}
查询排序
public class QueryDoc {

	public static final ElasticsearchTask SEARCH_WITH_ORDER = client -> {
        // 创建搜索请求对象
        SearchRequest request = new SearchRequest();
        request.indices("user");

        // 构建查询的请求体
        SearchSourceBuilder sourceBuilder = new SearchSourceBuilder();
        sourceBuilder.query(QueryBuilders.matchAllQuery());
        // 排序
        sourceBuilder.sort("age", SortOrder.ASC);
        request.source(sourceBuilder);
        SearchResponse response = client.search(request, RequestOptions.DEFAULT);
        // 查询匹配
        SearchHits hits = response.getHits();
        System.out.println("took:" + response.getTook());
        System.out.println("timeout:" + response.isTimedOut());
        System.out.println("total:" + hits.getTotalHits());
        System.out.println("MaxScore:" + hits.getMaxScore());
        System.out.println("hits========>>");
        for (SearchHit hit : hits) {
        //输出每条查询的结果信息
            System.out.println(hit.getSourceAsString());
        }
        System.out.println("<<========");
    };

    public static void main(String[] args) {
        ConnectElasticsearch.connect(SEARCH_WITH_ORDER);
    }

}
组合查询
public class QueryDoc {

	public static final ElasticsearchTask SEARCH_BY_BOOL_CONDITION = client -> {
        // 创建搜索请求对象
        SearchRequest request = new SearchRequest();
        request.indices("user");
        // 构建查询的请求体
        SearchSourceBuilder sourceBuilder = new SearchSourceBuilder();
        BoolQueryBuilder boolQueryBuilder = QueryBuilders.boolQuery();
        // 必须包含
        boolQueryBuilder.must(QueryBuilders.matchQuery("age", "30"));
        // 一定不含
        boolQueryBuilder.mustNot(QueryBuilders.matchQuery("name", "zhangsan"));
        // 可能包含
        boolQueryBuilder.should(QueryBuilders.matchQuery("sex", "男"));
        sourceBuilder.query(boolQueryBuilder);
        request.source(sourceBuilder);
        SearchResponse response = client.search(request, RequestOptions.DEFAULT);
        // 查询匹配
        SearchHits hits = response.getHits();
        System.out.println("took:" + response.getTook());
        System.out.println("timeout:" + response.isTimedOut());
        System.out.println("total:" + hits.getTotalHits());
        System.out.println("MaxScore:" + hits.getMaxScore());
        System.out.println("hits========>>");
        for (SearchHit hit : hits) {
            //输出每条查询的结果信息
            System.out.println(hit.getSourceAsString());
        }
        System.out.println("<<========");

    };

    public static void main(String[] args) {
        ConnectElasticsearch.connect(SEARCH_BY_BOOL_CONDITION);
    }
}
范围查询
public class QueryDoc {

	public static final ElasticsearchTask SEARCH_BY_RANGE = client -> {
        // 创建搜索请求对象
        SearchRequest request = new SearchRequest();
        request.indices("user");
        // 构建查询的请求体
        SearchSourceBuilder sourceBuilder = new SearchSourceBuilder();
        RangeQueryBuilder rangeQuery = QueryBuilders.rangeQuery("age");
        // 大于等于
        //rangeQuery.gte("30");
        // 小于等于
        rangeQuery.lte("40");
        sourceBuilder.query(rangeQuery);
        request.source(sourceBuilder);
        SearchResponse response = client.search(request, RequestOptions.DEFAULT);
        // 查询匹配
        SearchHits hits = response.getHits();
        System.out.println("took:" + response.getTook());
        System.out.println("timeout:" + response.isTimedOut());
        System.out.println("total:" + hits.getTotalHits());
        System.out.println("MaxScore:" + hits.getMaxScore());
        System.out.println("hits========>>");
        for (SearchHit hit : hits) {
        //输出每条查询的结果信息
            System.out.println(hit.getSourceAsString());
        }
        System.out.println("<<========");
    };

    public static void main(String[] args) {
        ConnectElasticsearch.connect(SEARCH_BY_RANGE);
    }

}
模糊查询
public class QueryDoc {

    public static final ElasticsearchTask SEARCH_BY_FUZZY_CONDITION = client -> {
        // 创建搜索请求对象
        SearchRequest request = new SearchRequest();
        request.indices("user");
        // 构建查询的请求体
        SearchSourceBuilder sourceBuilder = new SearchSourceBuilder();
        sourceBuilder.query(QueryBuilders.fuzzyQuery("name","wangwu").fuzziness(Fuzziness.ONE));
        request.source(sourceBuilder);
        SearchResponse response = client.search(request, RequestOptions.DEFAULT);
        // 查询匹配
        SearchHits hits = response.getHits();
        System.out.println("took:" + response.getTook());
        System.out.println("timeout:" + response.isTimedOut());
        System.out.println("total:" + hits.getTotalHits());
        System.out.println("MaxScore:" + hits.getMaxScore());
        System.out.println("hits========>>");
        for (SearchHit hit : hits) {
            //输出每条查询的结果信息
            System.out.println(hit.getSourceAsString());
        }
        System.out.println("<<========");
    };


    public static void main(String[] args) {
//        ConnectElasticsearch.connect(SEARCH_ALL);
//        ConnectElasticsearch.connect(SEARCH_BY_CONDITION);
//        ConnectElasticsearch.connect(SEARCH_BY_PAGING);
//        ConnectElasticsearch.connect(SEARCH_WITH_ORDER);
//        ConnectElasticsearch.connect(SEARCH_BY_BOOL_CONDITION);
//        ConnectElasticsearch.connect(SEARCH_BY_RANGE);
        ConnectElasticsearch.connect(SEARCH_BY_FUZZY_CONDITION);
    }

}
高亮查询
public class QueryDoc {

    public static final ElasticsearchTask SEARCH_WITH_HIGHLIGHT = client -> {
        // 高亮查询
        SearchRequest request = new SearchRequest().indices("user");
        //2.创建查询请求体构建器
        SearchSourceBuilder sourceBuilder = new SearchSourceBuilder();
        //构建查询方式:高亮查询
        TermsQueryBuilder termsQueryBuilder =
                QueryBuilders.termsQuery("name","zhangsan");
        //设置查询方式
        sourceBuilder.query(termsQueryBuilder);
        //构建高亮字段
        HighlightBuilder highlightBuilder = new HighlightBuilder();
        highlightBuilder.preTags("<font color='red'>");//设置标签前缀
        highlightBuilder.postTags("</font>");//设置标签后缀
        highlightBuilder.field("name");//设置高亮字段
        //设置高亮构建对象
        sourceBuilder.highlighter(highlightBuilder);
        //设置请求体
        request.source(sourceBuilder);
        //3.客户端发送请求,获取响应对象
        SearchResponse response = client.search(request, RequestOptions.DEFAULT);
        //4.打印响应结果
        SearchHits hits = response.getHits();
        System.out.println("took::"+response.getTook());
        System.out.println("time_out::"+response.isTimedOut());
        System.out.println("total::"+hits.getTotalHits());
        System.out.println("max_score::"+hits.getMaxScore());
        System.out.println("hits::::>>");
        for (SearchHit hit : hits) {
            String sourceAsString = hit.getSourceAsString();
            System.out.println(sourceAsString);
            //打印高亮结果
            Map<String, HighlightField> highlightFields = hit.getHighlightFields();
            System.out.println(highlightFields);
        }
        System.out.println("<<::::");
    };


    public static void main(String[] args) {
        ConnectElasticsearch.connect(SEARCH_WITH_HIGHLIGHT);
    }

}
最大值查询
public class QueryDoc {

    public static final ElasticsearchTask SEARCH_WITH_MAX = client -> {
        // 高亮查询
        SearchRequest request = new SearchRequest().indices("user");
        SearchSourceBuilder sourceBuilder = new SearchSourceBuilder();
        sourceBuilder.aggregation(AggregationBuilders.max("maxAge").field("age"));
        //设置请求体
        request.source(sourceBuilder);
        //3.客户端发送请求,获取响应对象
        SearchResponse response = client.search(request, RequestOptions.DEFAULT);
        //4.打印响应结果
        SearchHits hits = response.getHits();
        System.out.println(response);
    };

    public static void main(String[] args) {
        ConnectElasticsearch.connect(SEARCH_WITH_MAX);
    }

}
分组查询
public class QueryDoc {

	public static final ElasticsearchTask SEARCH_WITH_GROUP = client -> {
        SearchRequest request = new SearchRequest().indices("user");
        SearchSourceBuilder sourceBuilder = new SearchSourceBuilder();
        sourceBuilder.aggregation(AggregationBuilders.terms("age_groupby").field("age"));
        //设置请求体
        request.source(sourceBuilder);
        //3.客户端发送请求,获取响应对象
        SearchResponse response = client.search(request, RequestOptions.DEFAULT);
        //4.打印响应结果
        SearchHits hits = response.getHits();
        System.out.println(response);
    };

    public static void main(String[] args) {
        ConnectElasticsearch.connect(SEARCH_WITH_GROUP);
    }

}
Elasticsearch环境
单台 Elasticsearch 服务器提供服务,往往都有最大的负载能力,超过这个阈值,服务器性能就会大大降低甚至不可用,所以生产环境中,一般都是运行在指定服务器集群中。除了负载能力,单点服务器也存在其他问题:
- 单台机器存储容量有限
- 单服务器容易出现单点故障,无法实现高可用
- 单服务的并发处理能力有限
- 配置服务器集群时,集群中节点数量没有限制,大于等于 2 个节点就可以看做是集群了
- 般出于高性能及高可用方面来考虑集群中节点数量都是 3 个以上
总之,集群能提高性能,增加容错
集群 Cluster
一个集群就是由一个或多个服务器节点组织在一起,共同持有整个的数据,并一起提供索引和搜索功能。 一个 Elasticsearch 集群有一个唯一的名字标识,这个名字默认就是”elasticsearch”。这个名字是重要的,因为一个节点只能通过指定某个集群的名字,来加入这个集群
节点 Node
集群中包含很多服务器, 一个节点就是其中的一个服务器。 作为集群的一部分,它存储数据,参与集群的索引和搜索功能
一个节点也是由一个名字来标识的,默认情况下,这个名字是一个随机的漫威漫画角色的名字,这个名字会在启动的时候赋予节点。这个名字对于管理工作来说挺重要的,因为在这个管理过程中,你会去确定网络中的哪些服务器对应于 Elasticsearch 集群中的哪些节点。
一个节点可以通过配置集群名称的方式来加入一个指定的集群。默认情况下,每个节点都会被安排加入到一个叫做“elasticsearch”的集群中,这意味着,如果你在你的网络中启动了若干个节点,并假定它们能够相互发现彼此,它们将会自动地形成并加入到一个叫做“elasticsearch”的集群中。
在一个集群里,只要你想,可以拥有任意多个节点。而且,如果当前你的网络中没有运行任何 Elasticsearch 节点,这时启动一个节点,会默认创建并加入一个叫做“elasticsearch”的集群。
Windows集群部署
- 创建 elasticsearch-cluster 文件夹
- 创建 elasticsearch-7.8.0-cluster 文件夹,在内部复制三个 elasticsearch 服务
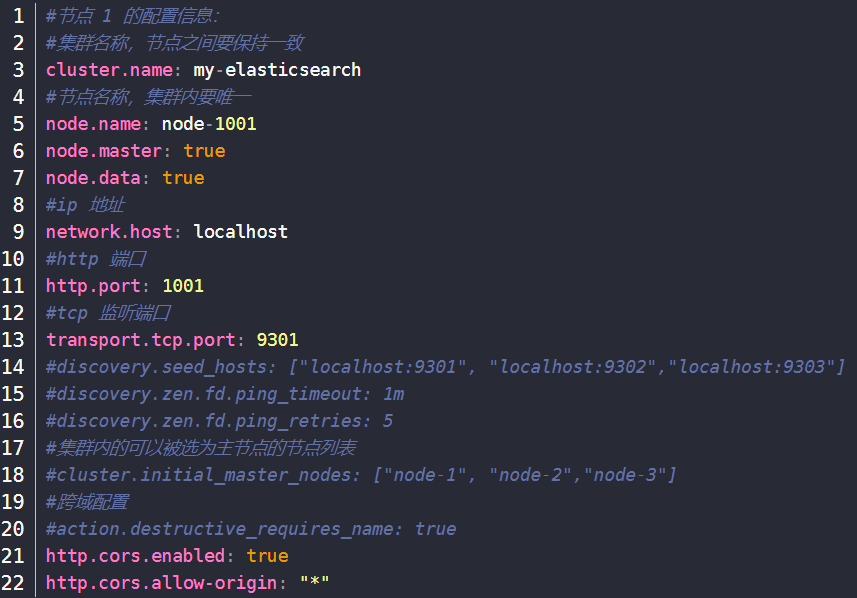
- 修改集群文件目录中每个节点的 config/elasticsearch.yml 配置文件
- 如果有必要,删除每个节点中的 data 目录中所有内容
启动集群,分别依次双击执行节点的 bin/elasticsearch.bat, 启动节点服务器(可以编写一个脚本启动),启动后,会自动加入指定名称的集群。
测试集群,用Postman,查看集群状态
GET http://127.0.0.1:1001/_cluster/health
GET http://127.0.0.1:1002/_cluster/health
GET http://127.0.0.1:1003/_cluster/health
{
    "cluster_name": "my-application",
    "status": "green",
    "timed_out": false,
    "number_of_nodes": 3,
    "number_of_data_nodes": 3,
    "active_primary_shards": 0,
    "active_shards": 0,
    "relocating_shards": 0,
    "initializing_shards": 0,
    "unassigned_shards": 0,
    "delayed_unassigned_shards": 0,
    "number_of_pending_tasks": 0,
    "number_of_in_flight_fetch": 0,
    "task_max_waiting_in_queue_millis": 0,
    "active_shards_percent_as_number": 100.0
}
status 字段指示着当前集群在总体上是否工作正常。它的三种颜色含义如下:
- green:所有的主分片和副本分片都正常运行
- yellow:所有的主分片都正常运行,但不是所有的副本分片都正常运行
- red:有主分片没能正常运行
用Postman,在一节点增加索引,另一节点获取索引
向集群中的node-1001节点增加索引:
#PUT http://127.0.0.1:1001/user向集群中的node-1003节点获取索引:
#GET http://127.0.0.1:1003/user如果在1003创建索引,同样在1001也能获取索引信息,这就是集群能力
环境-Linux单节点部署
# 解压缩
tar -zxvf elasticsearch-7.8.0-linux-x86_64.tar.gz -C /opt/module

# 改名
mv elasticsearch-7.8.0 es

useradd es # 新增 es 用户

passwd es # 为 es 用户设置密码

userdel -r es # 如果错了,可以删除再加

chown -R es:es /opt/module/es # 文件夹所有者
修改 /opt/module/es/config/elasticsearch.yml 文件
# 加入如下配置
cluster.name: elasticsearch
node.name: node-1
network.host: 0.0.0.0
http.port: 9200
cluster.initial_master_nodes: ["node-1"]
修改 /etc/security/limits.conf
# 在文件末尾中增加下面内容
# 每个进程可以打开的文件数的限制
es soft nofile 65536
es hard nofile 65536
修改 /etc/security/limits.d/20-nproc.conf
# 在文件末尾中增加下面内容
# 每个进程可以打开的文件数的限制
es soft nofile 65536
es hard nofile 65536
# 操作系统级别对每个用户创建的进程数的限制
* hard nproc 4096
# 注: * 带表 Linux 所有用户名称修改/etc/sysctl.conf
# 在文件中增加下面内容
# 一个进程可以拥有的 VMA(虚拟内存区域)的数量,默认值为 65536
vm.max_map_count=655360
重新加载
sysctl -p

# 使用 ES 用户启动
cd /opt/module/es/

#启动
bin/elasticsearch

#后台启动
bin/elasticsearch -d
启动时,会动态生成文件,如果文件所属用户不匹配,会发生错误,需要重新进行修改用户和用户组
# 暂时关闭防火墙
systemctl stop firewalld
# 永久关闭防火墙
systemctl enable firewalld.service # 打开防火墙永久性生效,重启后不会复原
systemctl disable firewalld.service # 关闭防火墙,永久性生效,重启后不会复原
测试软件 浏览器中输入地址: http://linux1:9200/
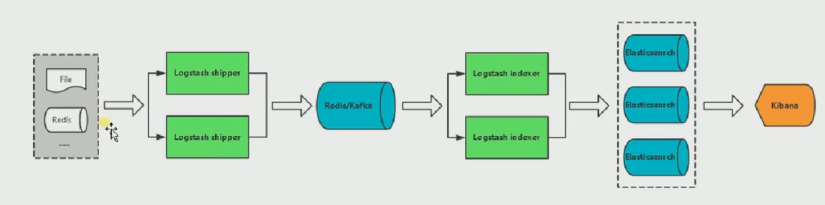
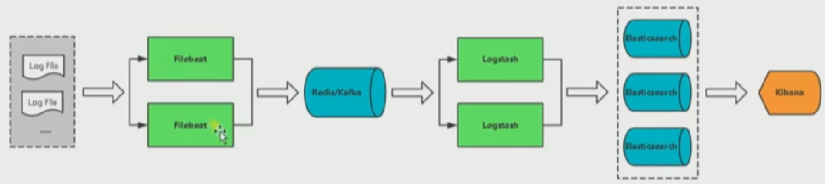
ELK Stack
- Input: 输入,输出数据可以是stdin,File,TCP,Redis,Syslog等
- Filter: 过滤,将日志格式化,有丰富的过滤插件,Grok正则捕获,Date日期处理,JSON解码,Mutate数据修改
- Output:输出,输出目标可以是Stdin,File,TCP,Redis,ES等
Elasticsearch-Head 插件
npm install
npm run start
#  http://localhost:9100/

# 修改es的yml文件
http.cors.enabled: true
http.cors.allow-origin: "*"
Logstash
input {
  beats {
    port => 5044
  }
}

output {
  elasticsearch {
    hosts => ["http://localhost:9200"]
    index => "%{[@metadata][beat]}-%{[@metadata][version]}-%{+YYYY.MM.dd}"
  }
}logstash -f logstash.confInput插件
input {
  stdin {

  }
}

output {
  stdout {
    codec => rubydebug
  }
}input {
file {
path => "/var/log/message"
tages => "123"
type => "syslog"
}
}
output {
stdout {
codec => rubydebug
}
}input {
tcp {
port => 9200
type => "nc"
}
}
output {
stdout {
codec => rubydebug
}
}input {
beats {
port => 5044
}
}
output {
stdout {
codec => rubydebug
}
}Codec插件
input {
  stdin {
    codec => json {
      charset => ["UTF-8"]
    }
  }
}

output {
  stdout {
    codec => rubydebug
  }
}input {
stdin {
codec => multiline {
// 不是以字符开头的,合并到上一行 正则匹配
pattern => "^\s"
// 合并到上一行还是下一行
what => "previous"
}
}
}
output {
stdout {
codec => rubydebug
}
}Filter
input {
  stdin {

  }
}
filter {
  json {
    // 解析字段
    source => "message"
    // 目标字段
    target => "content"
  }
}

output {
  stdout {
    codec => rubydebug
  }
}input {
stdin {
}
}
filter {
kv {
// 根据 & 和 ? 拆分字符串
fleld_split => "&?"
// 使用正则表达式
fleld_split_pattern => ":+"
}
}
output {
stdout {
codec => rubydebug
}
}
input {
stdin {
}
}
filter {
gork {
match => {
# 正则匹配消息 日志示例: 223.72.85.86 GET /index.html 15824 0.043
"message" => "%{IP:client} %{WORD:method} %{URIPATHPARAM:request} %{NUMBER:bytes} %{NUMBER:duration}"
}
}
geoip {
source => "client"
database => "D:\path\ELK\GeoLite2-City_20220503/GeoLite2-City.mmdb"
}
}
output {
stdout {
codec => rubydebug
}
}
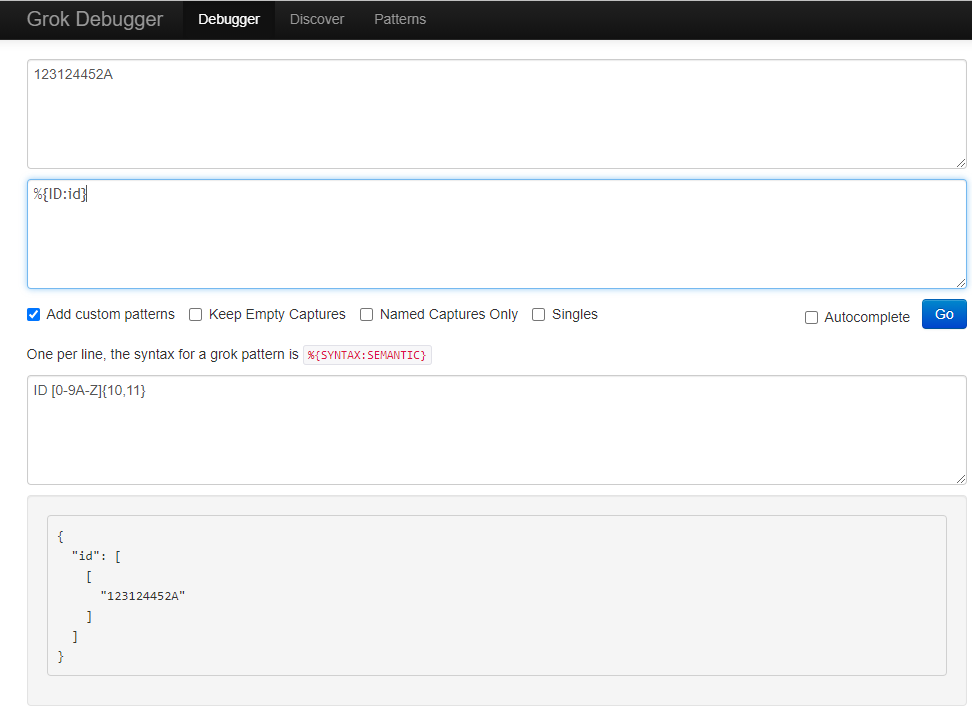
# 自定义匹配方式
gork {
// ID [0-9A-Z]{10,11}
patterns_dir => "D:\path\ELK\patterns\id_dir"
match => {
// 正则匹配消息 日志示例: 123124452A
"message" => "%{ID:id}"
}
}
# 匹配多个
gork {
// ID [0-9A-Z]{10,11}
patterns_dir => "D:\path\ELK\patterns\id_dir"
match => [
"message", "%{IP:client} %{WORD:method}",
"message", "%{ID:id}"
]
}
Output插件
input {
  file {
    path => ["/var/log/messages"]
    type => "system"
    tags => ["syslog","test"]
    start_position => "beginning"
  }
  file {
    path => ["/var/log/audit/audit.log"]
    type => "system"
    tags => ["auth","test"]
    start_position => "beginning"
  }
}
filter {

}

output {
  if [type] == "system" {
    if [tages][0] == "syslog" {
      elasticsearch {
         hosts => ["http://localhost:9200"]
         index => "logstash-system-syslog-%{+YYYY.MM.dd}"
      }
      stdout {
         codec => rubydebug
      }
    }
    else if [tages][0] == "auth" {
       elasticsearch {
         hosts => ["http://localhost:9200"]
         index => "logstash-system-auth-%{+YYYY.MM.dd}"
      }
      stdout {
         codec => rubydebug
      }
    }
  }
}
Kibana
- PV/UV
- 用户地理位置分布
- URL,HTTP Status,IP TOP10
i18n.locale: "zh-CN"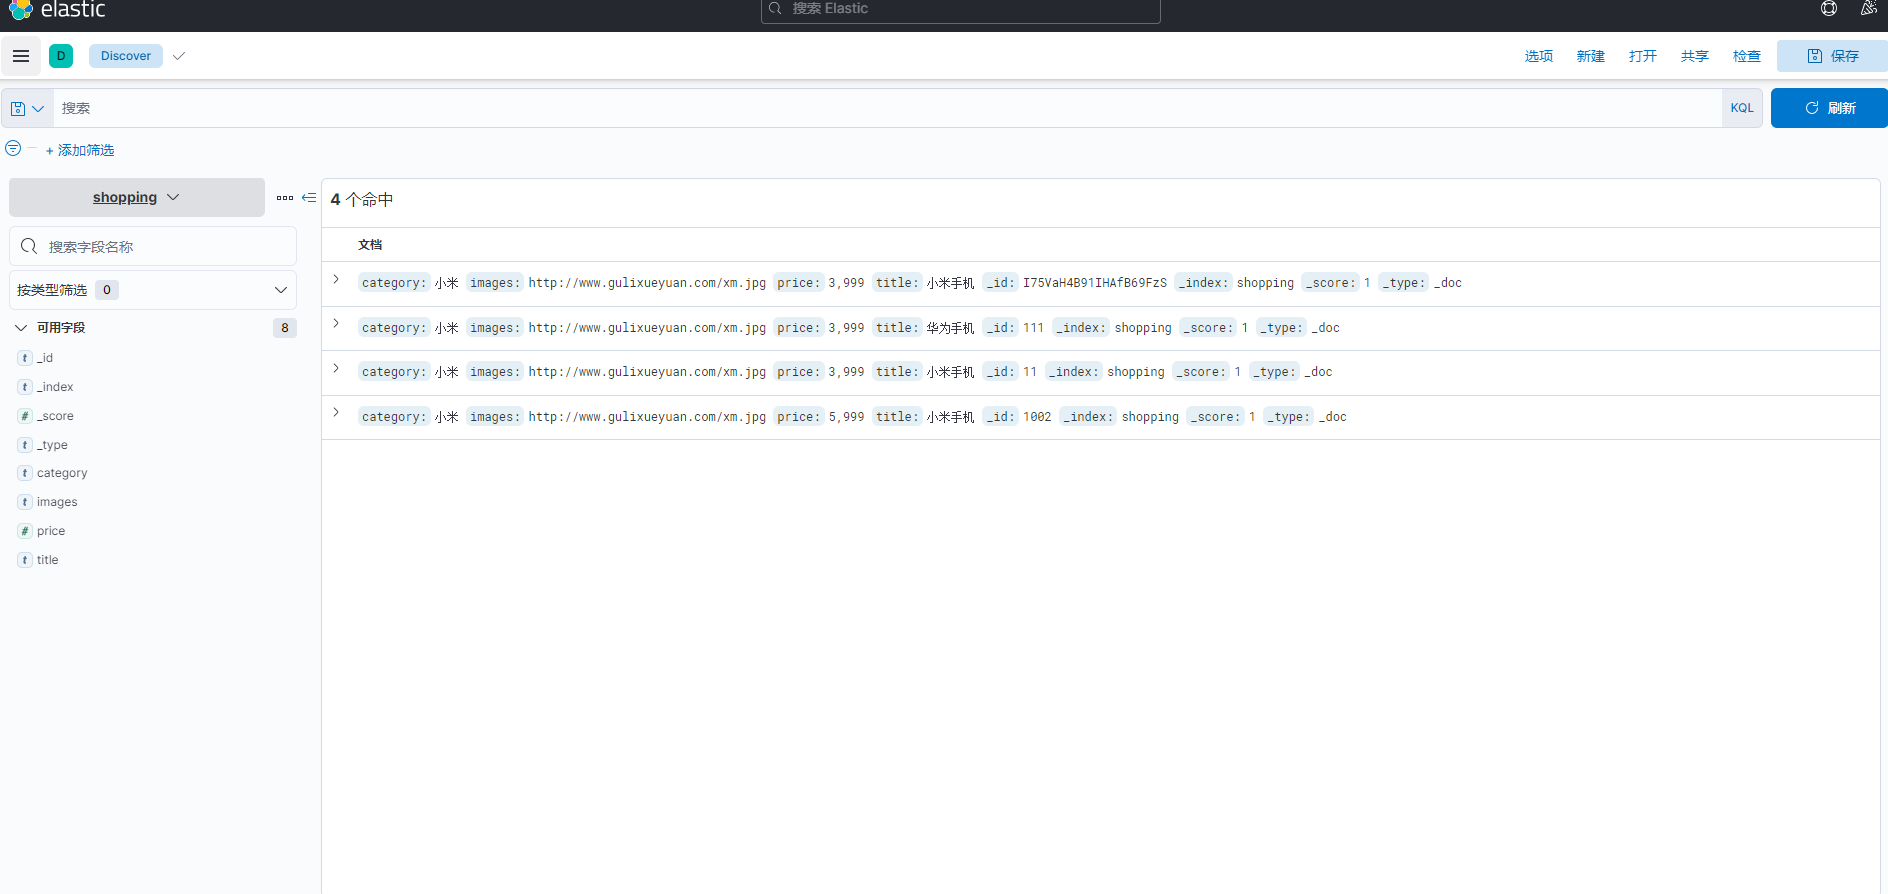 使用nginx代理kibana
http {
  server {
    listen 80;
    server_name localhost;

    location / {
      proxy_pass http://localhost:5601;
      auth_basic "请输入用户名和密码!";
      # 指定用户文件
      auth_basic_user_file /mydata/nginx/conf/user.db;
      root html;
      index index.html index.htm;
    }

  }
}# 生成密文密码
openssl passwd -crytp 123456# 用户名:密码
fxb: faHgR3X/qNehARedis
input {
  file {
    path => ["/var/log/messages"]
    type => "system"
    tags => ["syslog","test"]
    start_position => "beginning"
  }
  file {
    path => ["/var/log/audit/audit.log"]
    type => "system"
    tags => ["auth","test"]
    start_position => "beginning"
  }
}

filter {

}

output {
  redis {
     host => ["localhost:6379"]
     password => "123456"
     db => "0"
     data_type => "list"
     key => "logstash"
  }
}input {
redis {
host => "localhost"
port => 6379
password => "123456"
db => "0"
data_type => "list"
key => "logstash"
}
}
filter {
}
output {
if [type] == "system" {
if [tages][0] == "syslog" {
elasticsearch {
hosts => ["http://localhost:9200"]
index => "logstash-system-syslog-%{+YYYY.MM.dd}"
}
stdout {
codec => rubydebug
}
}
else if [tages][0] == "auth" {
elasticsearch {
hosts => ["http://localhost:9200"]
index => "logstash-system-auth-%{+YYYY.MM.dd}"
}
stdout {
codec => rubydebug
}
}
}
}FileBeat
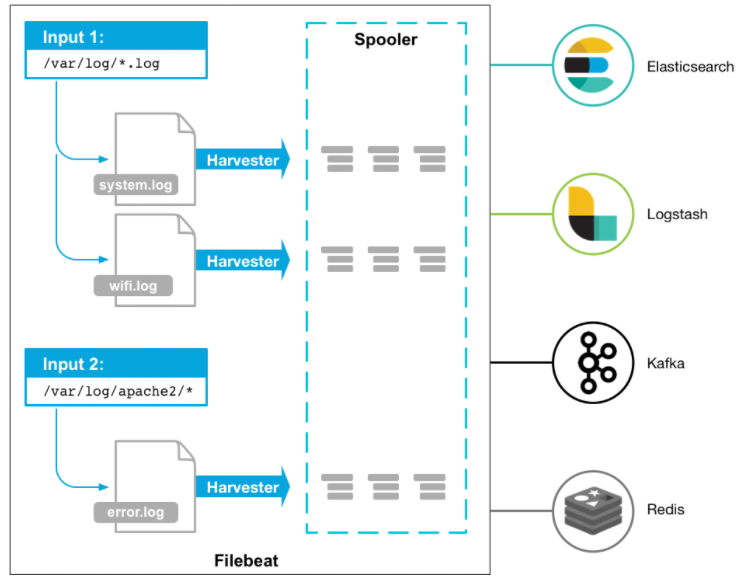
filebeat.inputs:
- type: log
  paths:
    - /var/log/system.log
  tags: ["syslog"]
fields:
  type: system
fields_under_root: true
- type: log
  paths:
    - /var/log/auth.log
  tags: ["auth"]
fields:
  type: system
fields_under_root: true

output.redis:
  hosts: ["localhost:6379"]
  password: "123456"
  key: "filebeat"
  db: 0
  timeout: 5
  datatype: list
日志收集
Nginx日志收集
# 日志
error_log /var/log/nginx/error.log warn;
pid /var/run/nginx.pid;
# http块
http {
# nginx默认格式
log_format main '$remote_addr - $remote_user [$time_local] "$request" '
'$status $body_bytes_sent "$http_referer" '
'"$http_user_agent" "$http_x_forwarded_for"';
# 自定义格式
# 时间戳 + 远程地址 + 远程用户 + 请求时间 + 状态码 + 请求方法 + 内存大小 + 扩展头部 + 用户代理
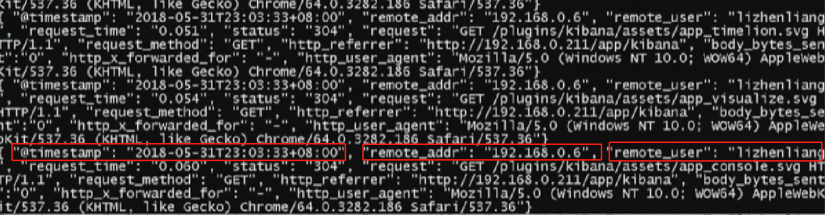
log_format json '{ "@timestamp": "$time_iso8601", '
'"remote_addr": "$remote_addr", '
'"remote_user": "$remote_user", '
'"request_time": "$request_time", '
'"status": "$status", '
'"request_uri": "$request_uri", '
'"request_method": "$request_method", '
'"http_referrer": "$http_referer", '
'"body_bytes_sent": "$body_bytes_sent", '
'"http_x_forwarded_for": "$http_x_forwarded_for", '
'"http_user_agent": "$http_user_agent"}';、
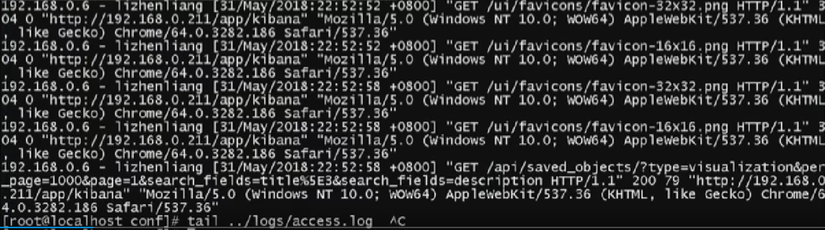
access_log /var/log/nginx/access.log json;
}
filebeat.inputs:
- type: log
  paths:
    - /var/log/nginx/access.log
  tags: ["access"]
fields:
  app: www
  type: ngxin-access
fields_under_root: true
- type: log
  paths:
    - /var/log/nginx/error.log
  tags: ["error"]
fields:
  app: www
  type: ngxin-error
fields_under_root: true

output.redis:
  hosts: ["localhost:6379"]
  password: "123456"
  key: "filebeat"
  db: 0
  timeout: 5
datatype: listinput {
redis {
host => "localhost"
port => 6379
password => "123456"
db => "0"
data_type => "list"
key => "filebeat"
}
}
filter {
if [app] == "www" {
if [type] == "nginx-access" {
json {
source => "message"
remove_field => ["message"]
}
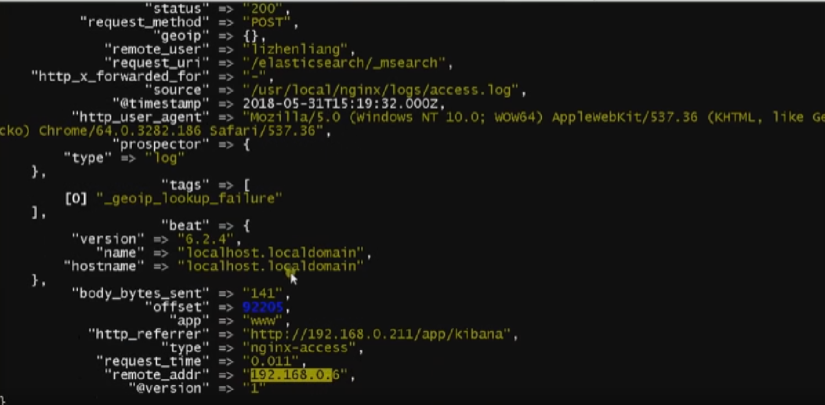
geoip {
source => "remote_addr"
target => "geoip"
database => "D:\path\ELK\GeoLite2-City_20220503\GeoLite2-City.mmdb"
add_field => ["[geoip][coordinates]", "%{[geoip][longitude]}"]
add_field => ["[geoip][coordinates]", "%{[geoip][latitude]}"]
}
mutate {
convert => ["[geoip][coordinates]", "float"]
}
}
}
}
output {
elasticsearch {
hosts => ["http://localhost:9200"]
index => "logstash-%{type}-%{+YYYY.MM.dd}"
}
stdout{codec => rubydebug }
}
Java堆栈日志收集
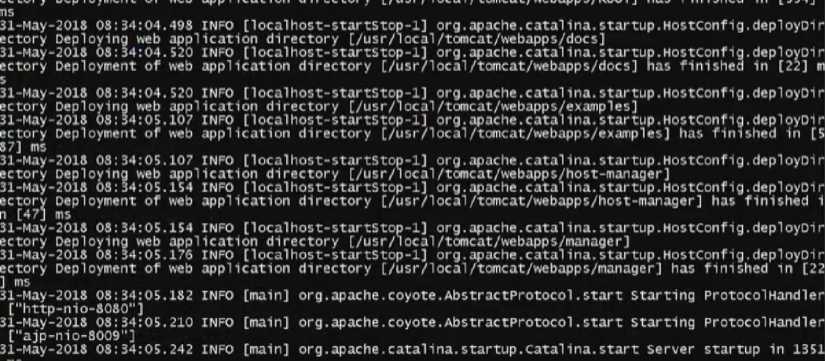
filebeat.prospectors:
- type: log
  paths:
    - /usr/local/tomcat/logs/catalina.out
  tags: ["tomcat"]
  fields:
    app: www
    type: tomcat-catalina
  fields_under_root: true
  multiline:
    pattern: '^\['
    negate: true
    match: after

output.redis:
  hosts: ["localhost:6379"]
  password: "123456"
  key: "filebeat"
  db: 0
  datatype: list
定制日志格式收集
ngxin默认的 main 格式日志 
使用 Grok 进行匹配
input {
redis {
host => "localhost"
port => 6379
password => "123456"
db => "0"
data_type => "list"
key => "filebeat"
}
}
filter {
if [app] == "www" {
if [type] == "nginx-access" {
grok {
match => {
"message" => "%{IPV4:remote_addr} - (%{USERNAME:remote_user}|-) \[%{HTTPDATE:time_local}\] \"%{WORD:request_method} %{URIPATHPARAM:request_uri} HTTP/%{NUMBER:http_protocol}\" %{NUMBER:http_status} %{NUMBER:body_bytes_sent} \"%{GREEDYDATA:http_referer}\" \"%{GREEDYDATA:http_user_agent}\" \"(%{IPV4:http_x_forwarded_for}|-)\""
}
overwrite => ["message"]
}
geoip {
source => "remote_addr"
target => "geoip"
database => "/opt/GeoLite2-City.mmdb"
add_field => ["[geoip][coordinates]", "%{[geoip][longitude]}"]
add_field => ["[geoip][coordinates]", "%{[geoip][latitude]}"]
}
date {
locale => "en"
match => ["time_local", "dd/MMM/yyyy:HH:mm:ss Z"]
}
mutate {
convert => ["[geoip][coordinates]", "float"]
}
}
}
}
output {
elasticsearch {
hosts => ["http://lcoalhost:9200"]
index => "logstash-%{type}-%{+YYYY.MM.dd}"
}
stdout{codec => rubydebug }
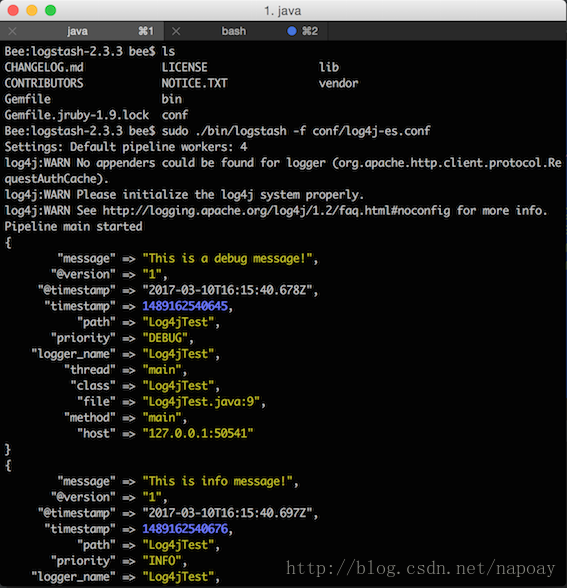
}Log4j收集
### 设置###
log4j.rootLogger = debug,stdout,D,E,logstash

### 输出信息到控制抬 ###
log4j.appender.stdout = org.apache.log4j.ConsoleAppender
log4j.appender.stdout.Target = System.out
log4j.appender.stdout.layout = org.apache.log4j.PatternLayout
log4j.appender.stdout.layout.ConversionPattern = [%-5p] %d{yyyy-MM-dd HH:mm:ss,SSS} method:%l%n%m%n

### 输出DEBUG 级别以上的日志到=/Users/bee/Documents/elk/log4j/debug.log###
log4j.appender.D = org.apache.log4j.DailyRollingFileAppender
log4j.appender.D.File = /Users/bee/Documents/elk/log4j/debug.log
log4j.appender.D.Append = true
log4j.appender.D.Threshold = DEBUG
log4j.appender.D.layout = org.apache.log4j.PatternLayout
log4j.appender.D.layout.ConversionPattern = %-d{yyyy-MM-dd HH:mm:ss}  [ %t:%r ] - [ %p ]  %m%n

### 输出ERROR 级别以上的日志到=/Users/bee/Documents/elk/log4j/error.log  ###
log4j.appender.E = org.apache.log4j.DailyRollingFileAppender
log4j.appender.E.File =/Users/bee/Documents/elk/log4j/error.log
log4j.appender.E.Append = true
log4j.appender.E.Threshold = ERROR
log4j.appender.E.layout = org.apache.log4j.PatternLayout
log4j.appender.E.layout.ConversionPattern = %-d{yyyy-MM-dd HH:mm:ss}  [ %t:%r ] - [ %p ]  %m%n

#输出日志到logstash
log4j.appender.logstash=org.apache.log4j.net.SocketAppender
log4j.appender.logstash.RemoteHost=127.0.0.1
log4j.appender.logstash.port=4560
log4j.appender.logstash.ReconnectionDelay=60000
log4j.appender.logstash.LocationInfo=true- 第一份输出到控制台
- 第二份把DEBUG 级别以上的日志到文件
- 第三份把输出ERROR 级别以上的日志到文件
- 第四份输出到logstash
input {
    log4j {
        host => "127.0.0.1"
        port => 8001
    }
}

output {
    elasticsearch{
        hosts => ["localhost:9200"]
        index => "log4j-%{+YYYY.MM.dd}"
    }
    stdout {
      codec => rubydebug
    }
}import org.apache.log4j.Logger;
/**
* Created by bee on 17/3/6.
*/
public class Log4jTest {
public static final Logger logger=Logger.getLogger(Log4jTest.class);
public static void main(String[] args) {
logger.debug("This is a debug message!");
logger.info("This is info message!");
logger.warn("This is a warn message!");
logger.error("This is error message!");
try{
System.out.println(5/0);
}catch(Exception e){
logger.error(e);
}
}
}